This is an all-new version of Vehicle Simulator that introduces full Webhook support for simulated vehicles, continued access to these vehicles via the Vehicle API, including vehicle commands, as well as granular control over nearly every vehicle signal available through the Smartcar platform. For legacy simulator documentation, click here.
1. Create a simulated vehicle
Choose a powertrain type
Select from BEV, ICE, HEV, or PHEV. The available vehicle data signals you can configure will vary based on the powertrain type you choose.Give it a name
The name you provide will also be reflected in the vehicle’s state within theVehicleIdentification.Nickname signal.
Optional: create without connection
Optionally create the simulated vehicle in a disconnected state. Learn more about simulated vehicle connections.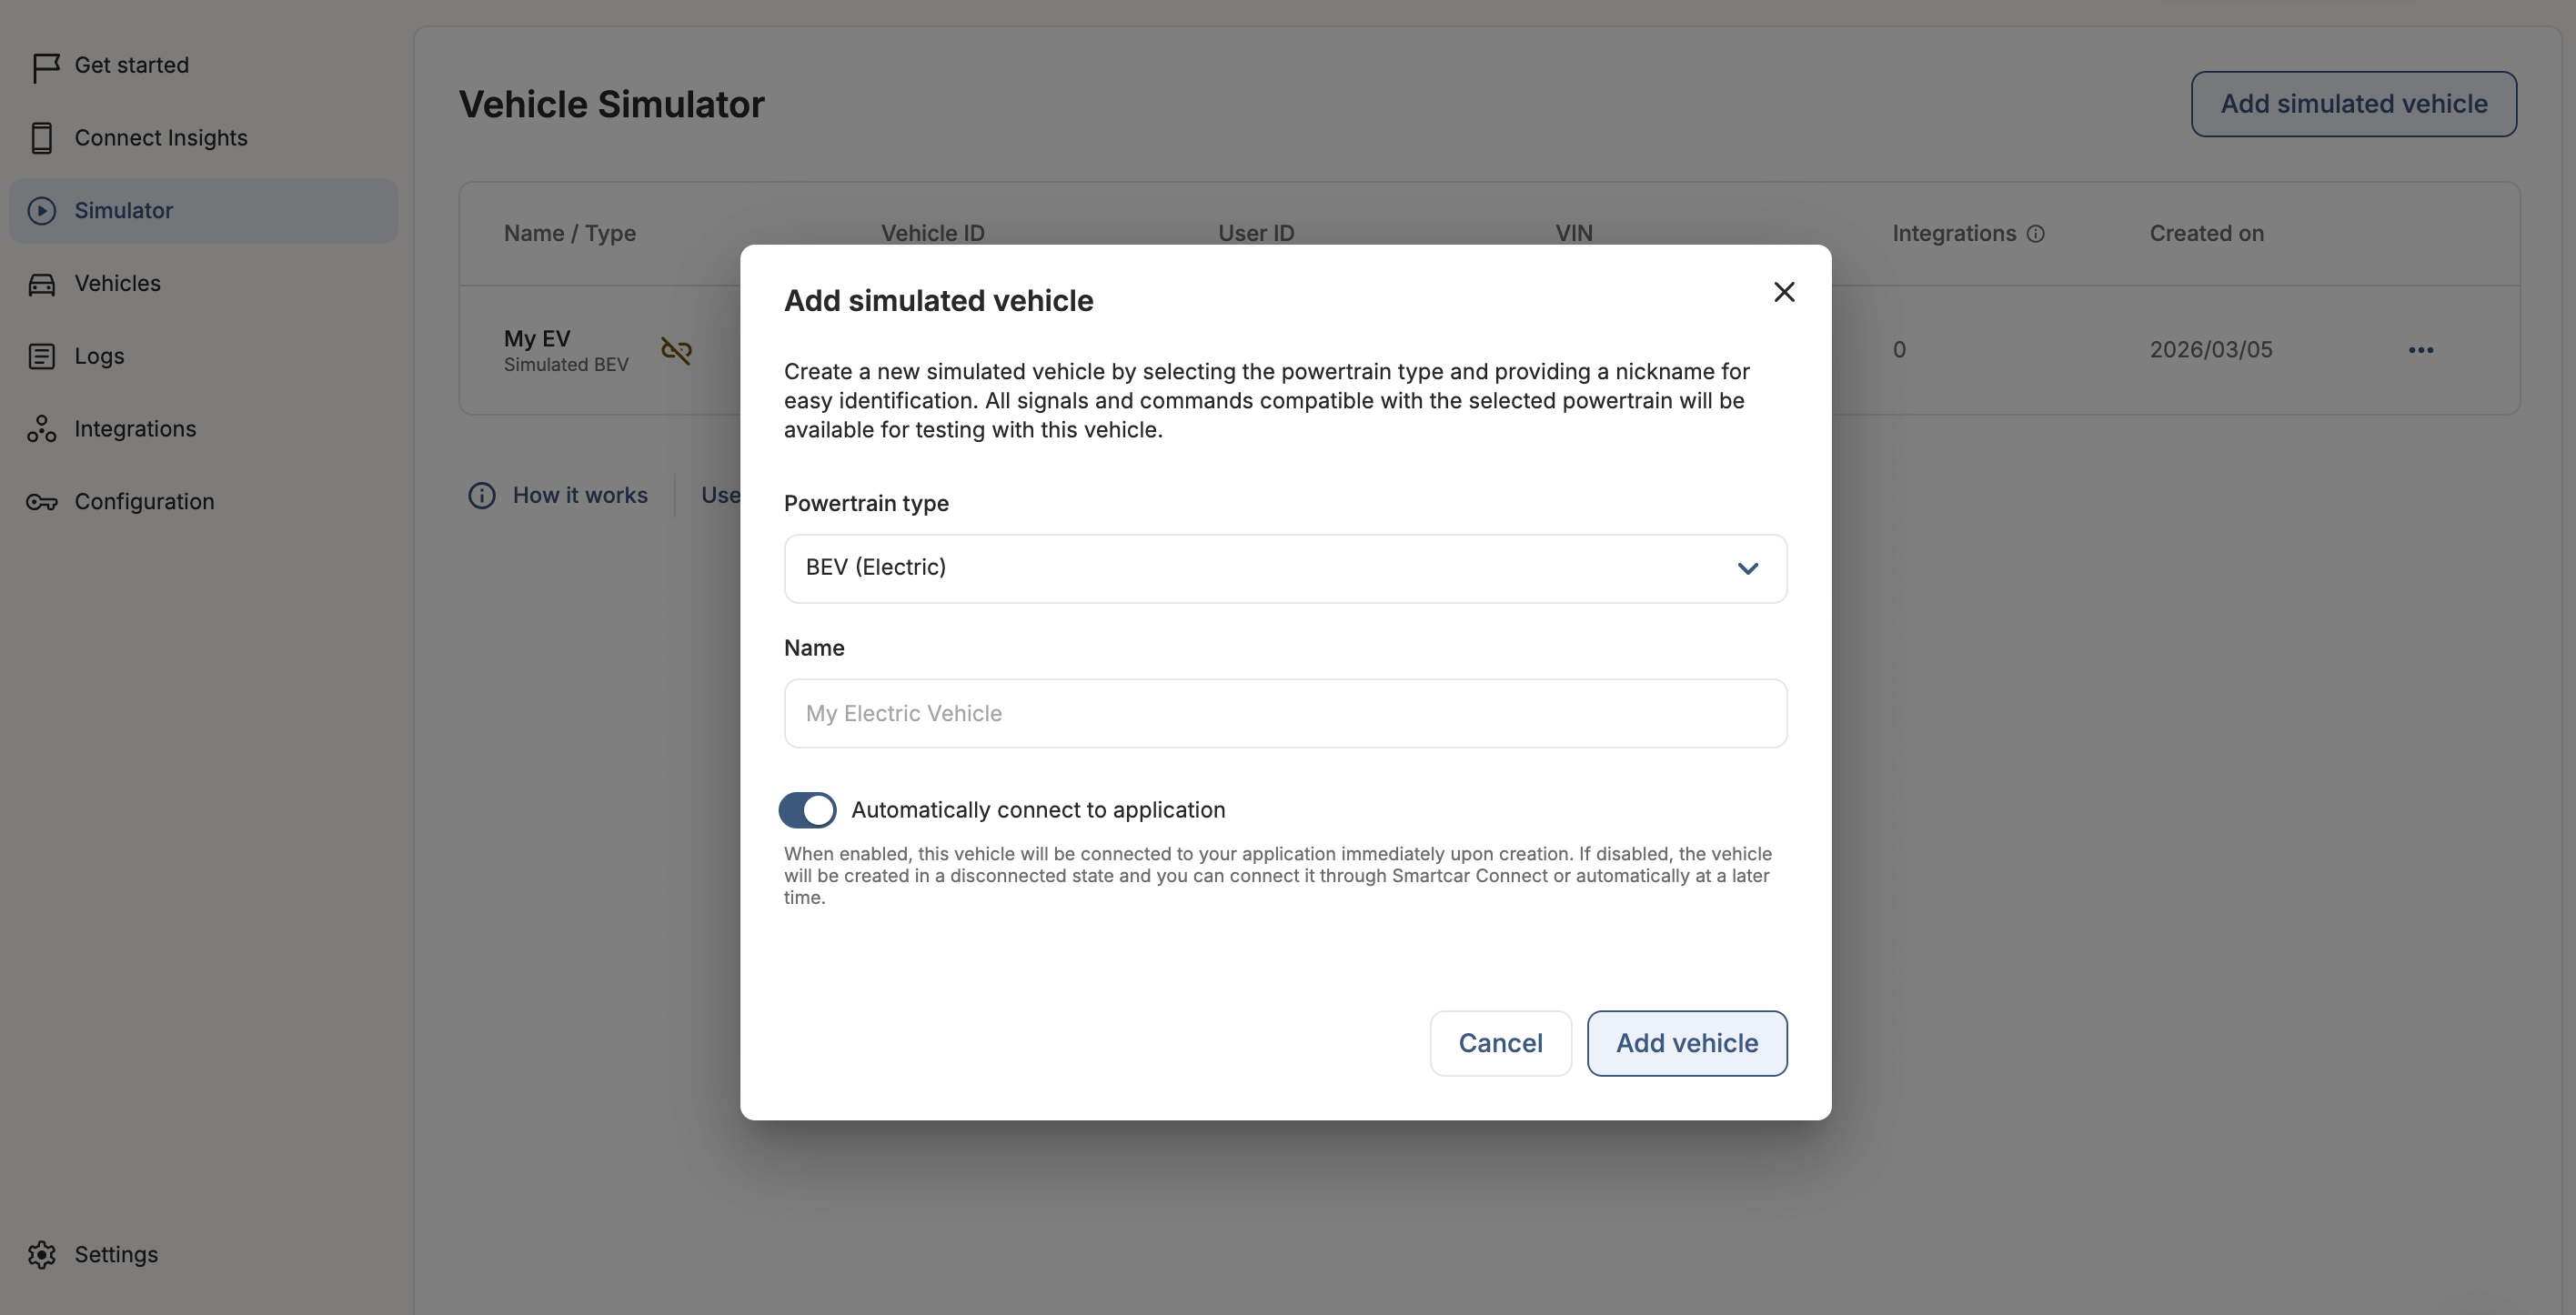
Your simulated vehicle is now connected
Once created, the vehicle is fully connected to your Smartcar application with automatically generated access tokens. You can immediately begin making API requests and commands to the vehicle, or continue on to subscribing the vehicle to an integration.- All compatible permissions are granted by default
- You can edit granted permissions later in the vehicle configuration
- Access tokens expire after two hours, just like live vehicle connections
- Simulated vehicles will appear in your connections and logs with
Simulatedas the make and the choosen powertrain type as the model, eg:2023 Simulated BEV.
2. Subscribe the vehicle to a webhook
Choose a webhook
Subscribe the simulated vehicle to one of your existing webhook integrations. If you don’t have a webhook integration yet, create your first integration.Simulated vehicles are not included in the webhook auto-subscription feature. You must manually subscribe simulated vehicles through the Simulator dashboard, even if auto-subscription is enabled for one or more of your integrations.
Receive the first delivery
After subscribing the vehicle to a verified and enabled webhook integration, you will receive your first payload within a few minutes.3. Configure the vehicle state
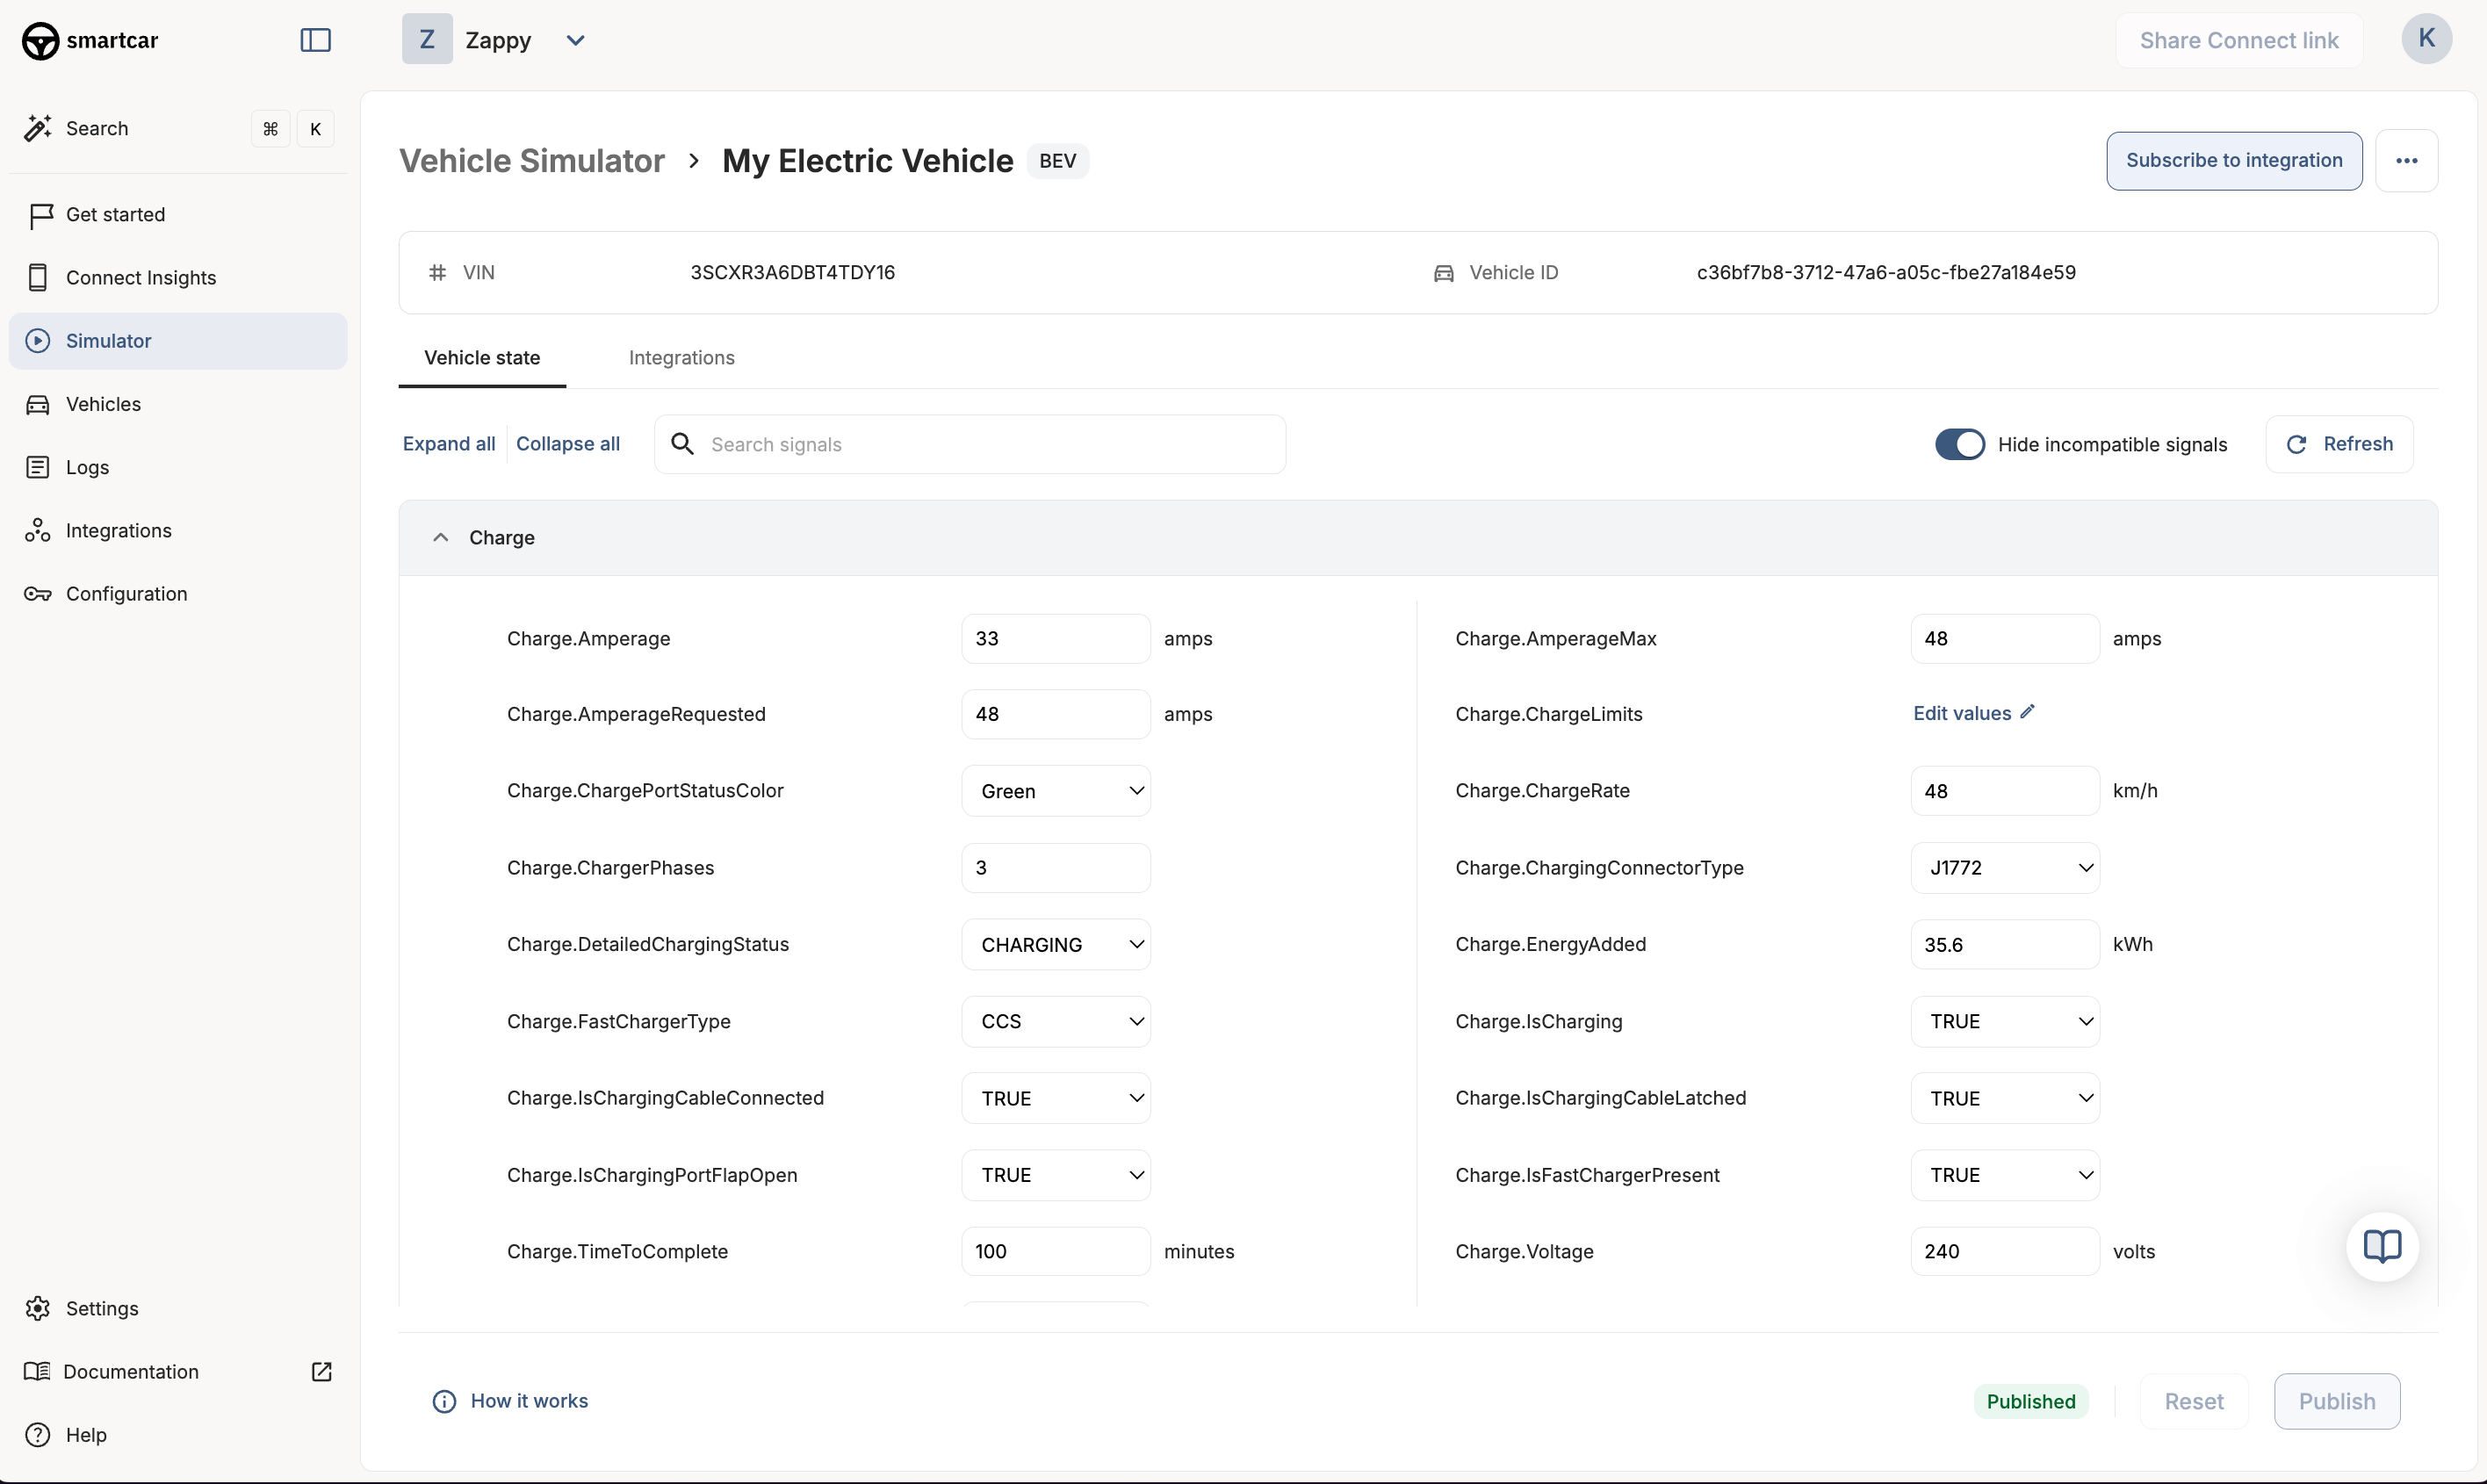
You control the current state of each vehicle data signal. Simulated vehicle state changes are entirely user-driven. All powertrain-type compatible signals are enabled for configuration by default.The Simulator is designed for logic testing with simulated vehicle data. Actual signal compatibility for a specific OEM brand can be found in the Compatibility Matrix.
Vehicle signals
Control the state of each vehicle data signal in the simulated vehicle’s configuration tab. You can edit one or many signals at a time. Click Publish to store the vehicle’s updated state. This state will be used in subsequent webhook payloads or API requests. If the published changes include a signal that is set as a trigger in your webhook integration, a new vehicle state or error event will be delivered to your application.Vehicle commands
Simulated vehicles support the following API commands: You can control access to these commands by editing the vehicle’s permissions. If you are testing commands while monitoring the vehicle’s state in the Simulator dashboard, click Refresh to view the vehicle’s updated state after the command request.Permissions
Simulated vehicles are granted all compatible permissions by default based on the chosen powertrain type. You can edit granted permissions under theVehicleUserAccount.Permissions signal in the Vehicle State panel.

4. Test you webhook integrations
Test your webhook integrations by configuring and publishing the vehicle state in different scenarios. Each set of published changes that includes a webhook trigger signal will deliver a webhook payload to your integration.You can view logs for simulated webhook payloads and API requests in the Dashboard Logs with the tables filtered to
simulated mode.5. Test error states
You can configure your simulated vehicle’s state to recreate error scenarios for testing. Examples:- Uncheck a permission in
VehicleUserAccount.Permissionsbefore triggering a webhook payload to receive aPERMISSIONSerror - Set the simulated vehicle’s
Transmission.GearStatetoDRIVEbefore making aPOST /securitylock request to receive aVEHICLE_STATE:IN_MOTIONerror
Simulated vehicles do not have rate limits or API command latencies to enable a faster and smoother testing experience. Live vehicles can expect to have rate limits and latencies.
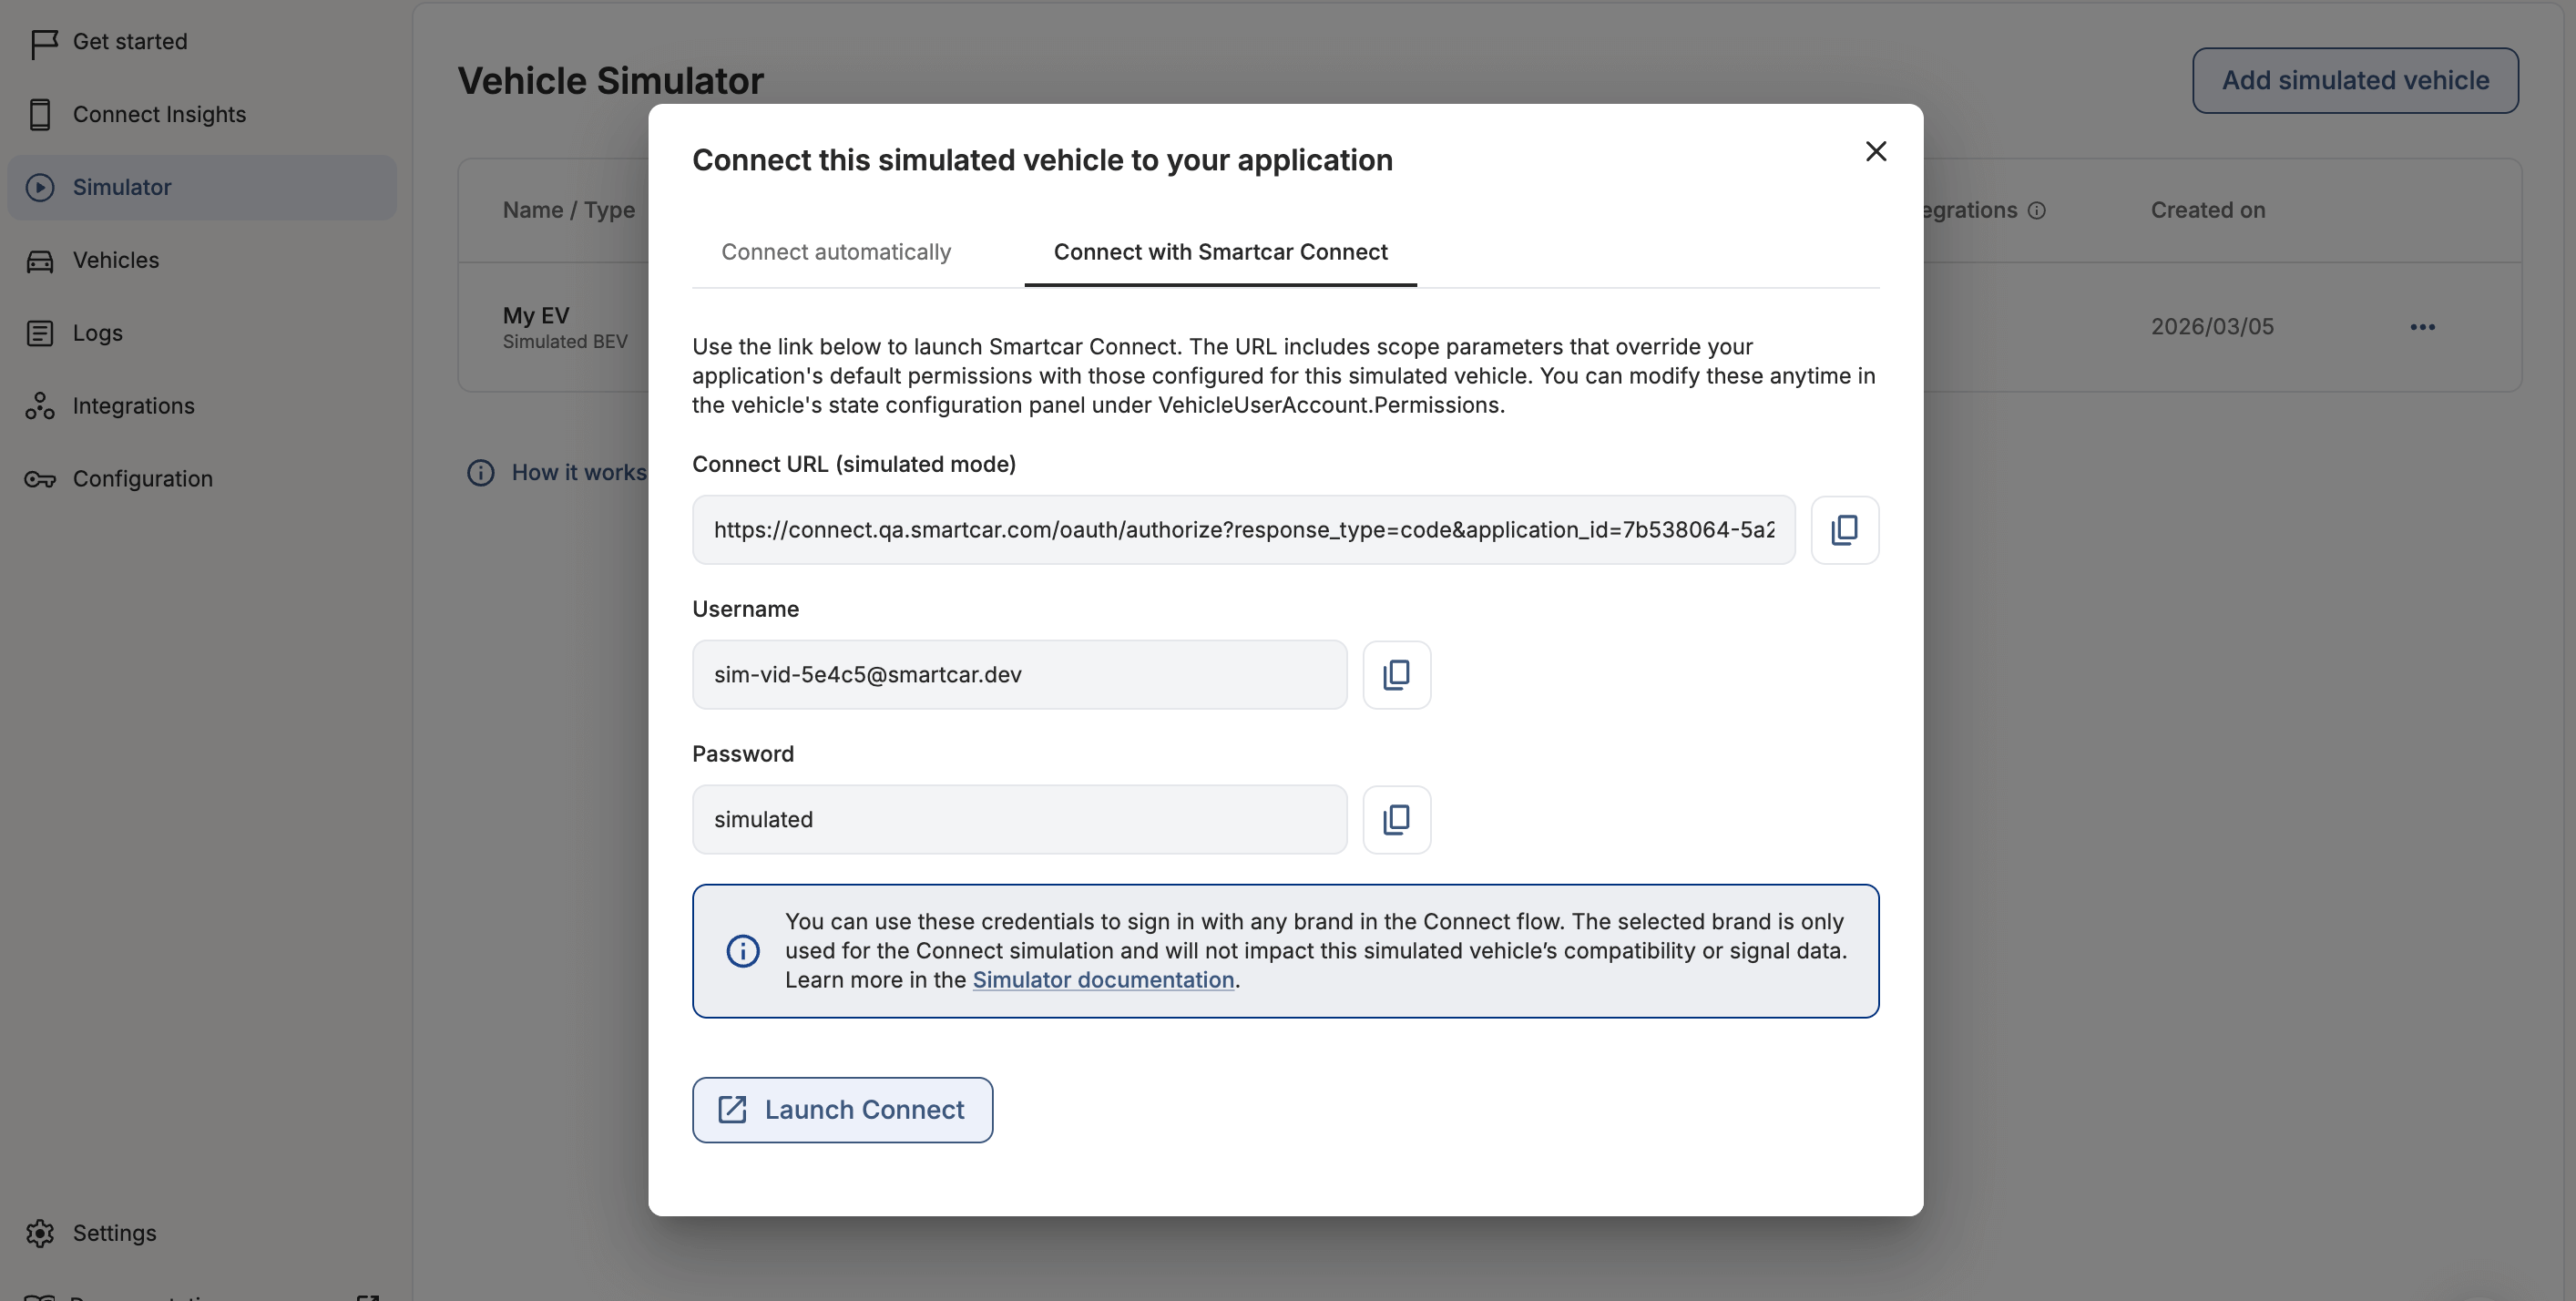
6. Test simulated vehicle connections
Use the Simulator to test vehicle connection and disconnection scenarios. By default, simulated vehicles are fully connected to your application upon creation. However, you can opt to create a simulated vehicle in a disconnected state and connect it later.Connect a simulated vehicle
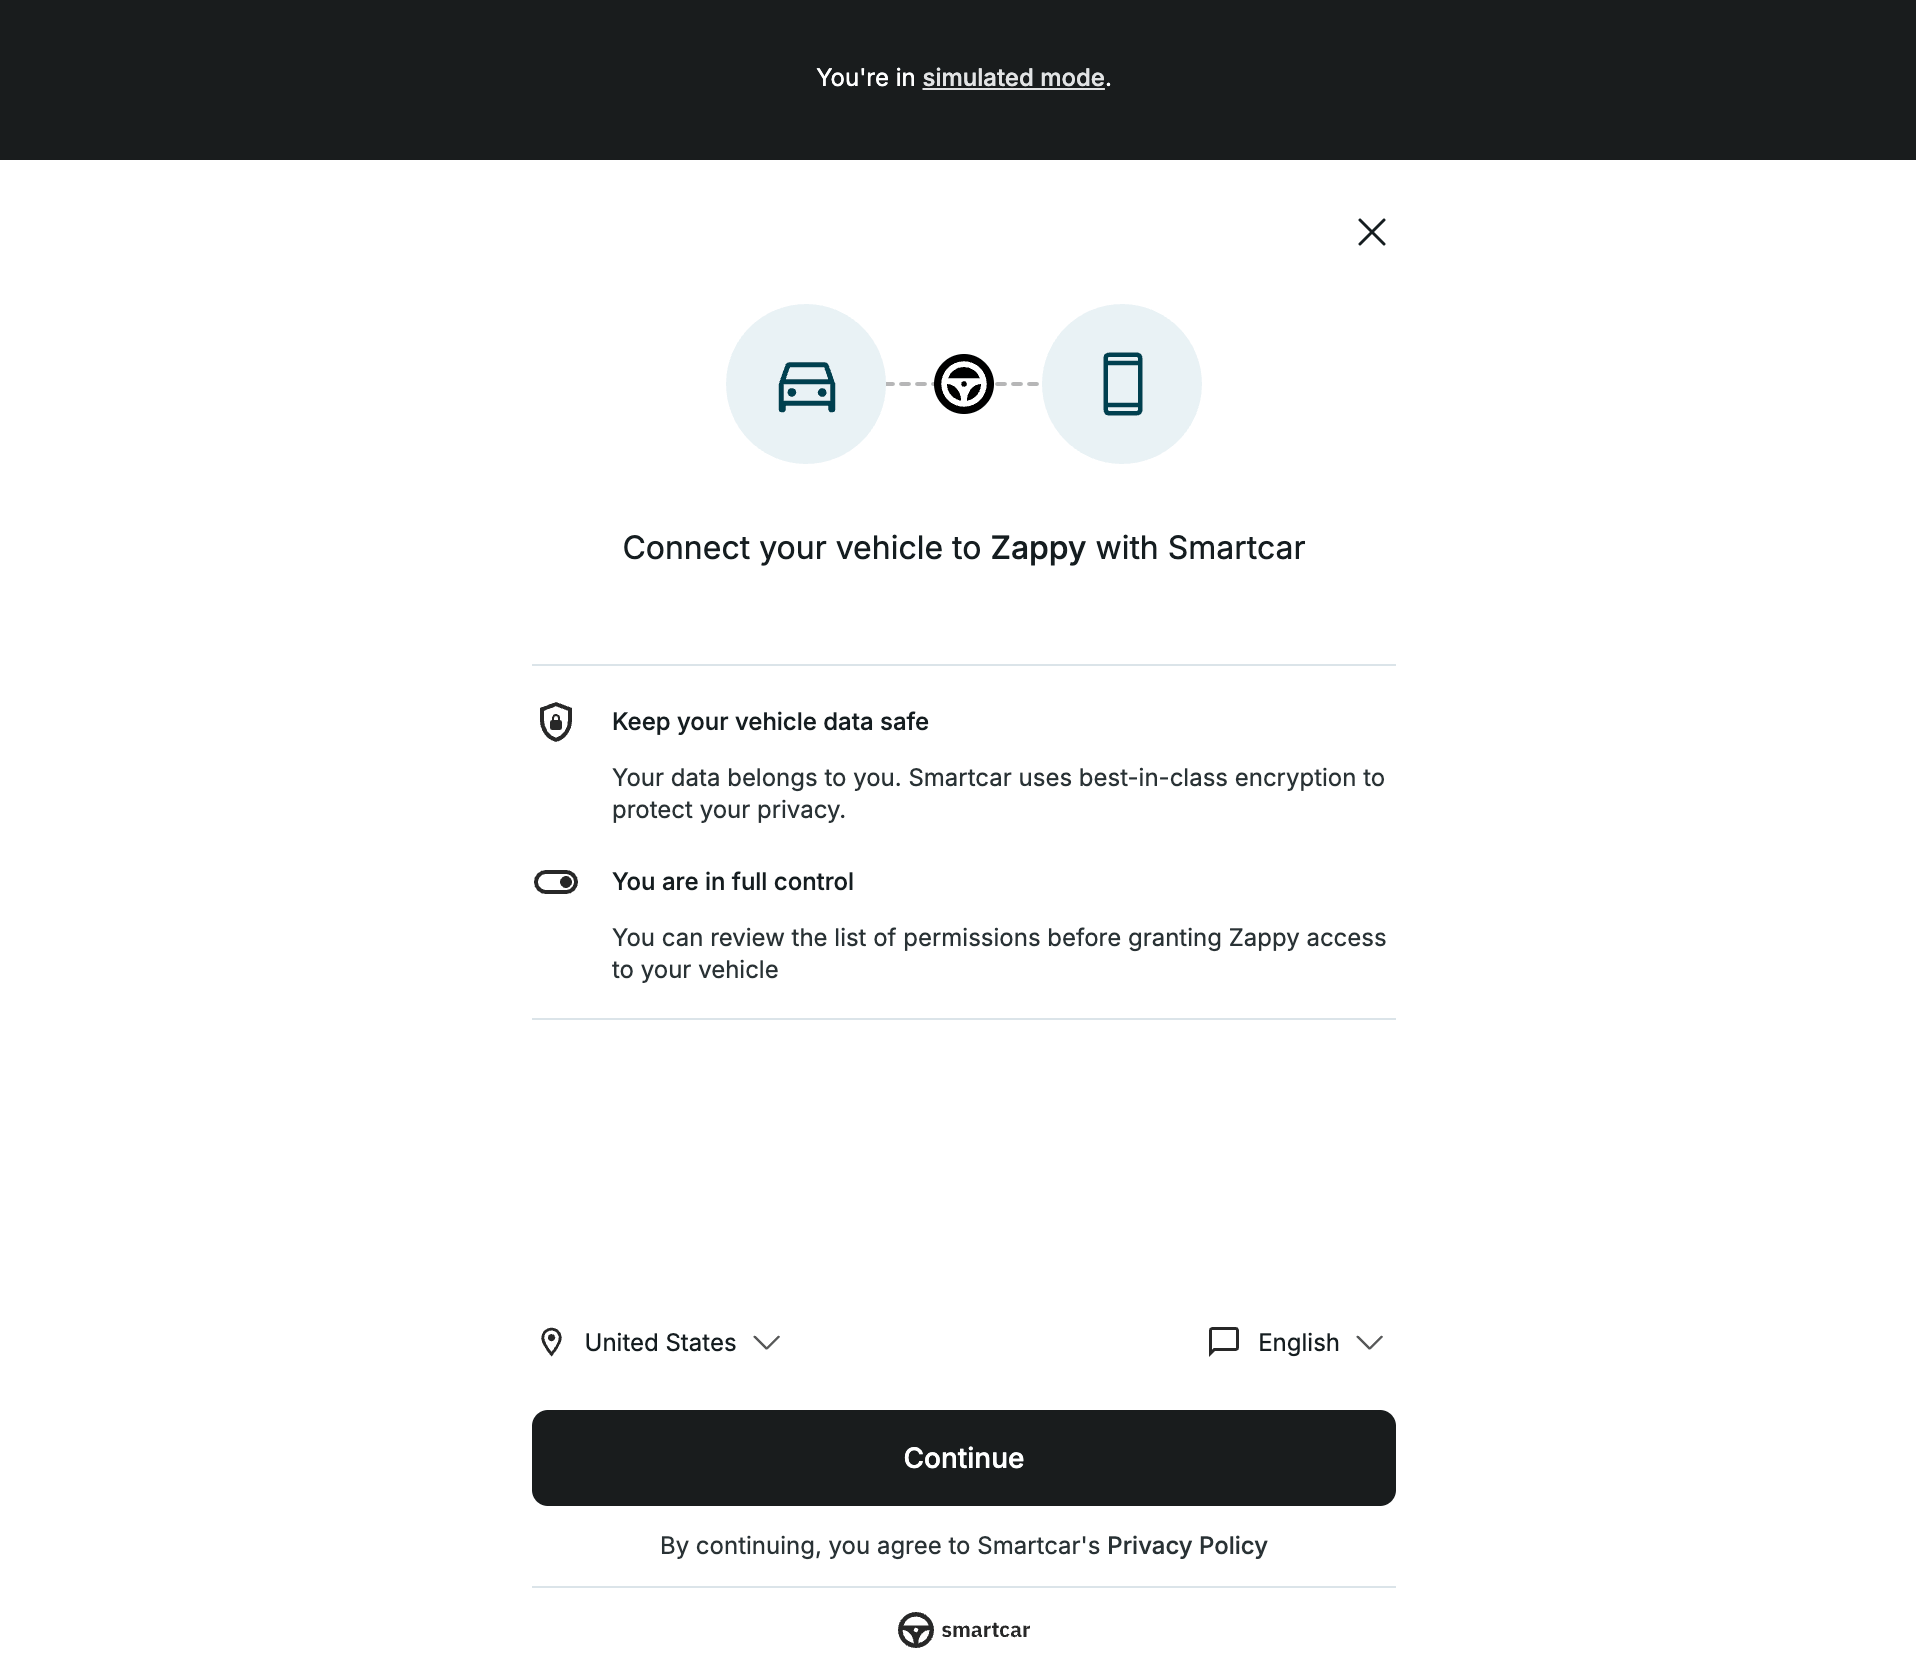
When connecting a simulated vehicle, you have two options depending on your testing needs; connecting automatically or simulating the vehicle owner experience using Smartcar Connect.Both options use the permissions configured in the simulated vehicle’s state under the signal VehicleUserAccount.Permissions, which will override any application-level permissions.
You can select any brand from the Connect flow brand select screen to authenticate the simulated vehicle with. The selected brand is only used for the Connect simulation and will not impact the simulated vehicle’s compatibility or simulation data.
Disconnect a simulated vehicle
You can disconnect a simulated vehicle from any of these locations:- In the Vehicle Connections table
- In the Simulated Vehicles table
- Via the delete vehicle connection endpoint
Managing simulated vehicle connections
Manage simulated vehicle connections in the Vehicle Connections dashboard alongside live vehicles. Filter the table by mode to show simulated vehicles only. Vehicles from the legacy Simulator are marked with a ‘Legacy’ chip.Why was my simulated vehicle disconnected?If you didn’t disconnect the vehicle manually, a team member may have, or it may have been created in a disconnected state. Simulated vehicles can be disconnected via the API or Vehicle Connections dashboard, just like live vehicles.