> ## Documentation Index
> Fetch the complete documentation index at: https://smartcar.com/docs/llms.txt
> Use this file to discover all available pages before exploring further.
# iOS Tutorial
> In this tutorial, we will use the iOS SDK to integrate Connect into your application.
Our frontend SDKs handle getting an authorization code representing a vehicle owner's consent for your application to interact with their vehicle
for the requested permissions. In order to make requests to a vehicle, please use one of our [backend SDKs](/docs/api-reference/api-sdks).
For security, token exchanges and requests to vehicles **should not** be made client side.
# Overview
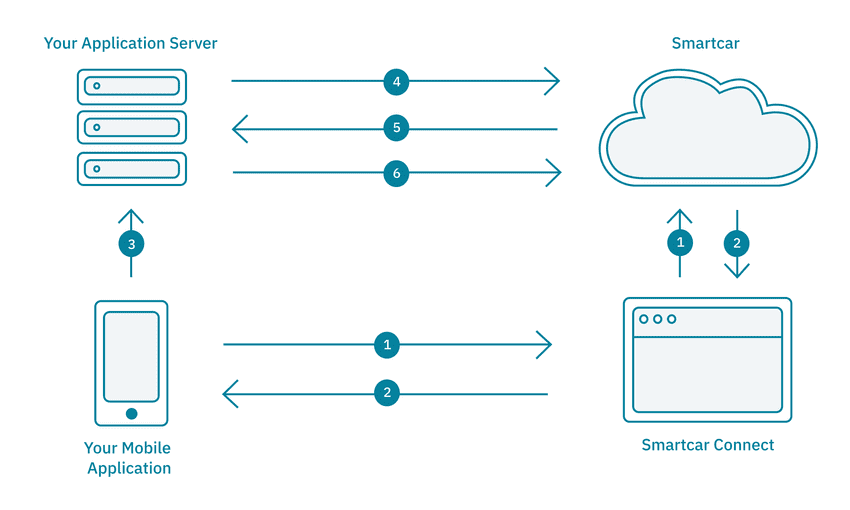
1. The Mobile Application launches a `SafariView` with Smartcar Connect to request access to a user’s vehicle.
On Connect, the user logs in with their vehicle credentials and grants the Application access to their vehicle.
2. The `SafariView` is redirected to a specified `REDIRECT_URI` along with a `user_id` and `state`.
This will be the custom scheme set on the application. The Smartcar iOS SDK receives the response in a view listening
for the specified custom scheme URI, and passes it to the Mobile Application.
3. The Mobile Application sends the received `user_id` to the Application’s backend service for storage.
4. The Application’s backend authenticates with the Smartcar API using the [OAuth 2.0 Client Credentials flow](/docs/api-reference/authorization/overview) to obtain an application-level access token.
5. Using the access token and the `sc-user-id` header, the Application can now send requests to the Smartcar API. It can access protected resources and send commands
to and from the user’s vehicle via the backend service.
# Prerequisites
* [Sign up](https://dashboard.smartcar.com/signup) for a Smartcar account.
* Make a note of your `CLIENT_ID` and `CLIENT_SECRET` from the **Configuration** section on the Dashboard.
* Add a custom scheme redirect URI to your application configuration.
* Add the `appServer` redirect URI from [step 2](/docs/getting-started/tutorials/ios/#setup) below to your application configuration.
For iOS, we require the custom URI scheme to be in the format of `sc` + `clientId` + `://` + `hostname`.
For now, you can just set it to `sc` + `clientId` + `://exchange`.
Please see our [Connect Docs](/docs/connect/dashboard-config#redirect-uris) for more information.
# Setup
1. Clone our repo and install the required dependencies:
```bash theme={null}
$git clone https://github.com/smartcar/getting-started-ios-sdk.git
$cd getting-started-ios-sdk/tutorial
$pod install
$open getting-started-ios-sdk.xcworkspace
```
2. Set the following constants in `Constants.swift`. We're setting `appServer` to `http://localhost:8000` to pass the authorization `code` from
the [Handle the Response](/docs/getting-started/tutorials/ios#handle-the-response) step later on in the tutorial to our backend.
```swift Constants.swift theme={null}
struct Constants {
static let clientId = "";
static let appServer = "http://localhost:8000";
}
```
# Build your Connect URL
Instantiate a `SmartcarAuth` object in the `viewdidLoad` function of the `ViewController`.
The iOS application will launch a `WebView` with Connect to request access to a user’s vehicle.
On Connect, the user logs in with the username and password for their vehicle’s connected services account
and grants the application access to their vehicle.
To launch Connect, we can use the `launchAuthFlow` function that our `SmartcarAuth` object has access to. We can place
this within the `connectPressed` action function.
```swift ViewController.swift theme={null}
let appDelegate = UIApplication.shared.delegate as! AppDelegate
func completionHandler(code: String?, state: String?, virtualKeyUrl: String?, err: AuthorizationError?,) -> Void {
// Receive authorization code
}
appDelegate.smartcar = SmartcarAuth(
clientId: "afb0b7d3-807f-4c61-9b04-352e91fe3134",
redirectUri: "scafb0b7d3-807f-4c61-9b04-352e91fe3134://exchange",
scope: ["read_vin", "read_vehicle_info", "read_odometer"],
mode: SCMode.simulated, //use SCMode.live to connect to a real vehicles
completionHandler: completionHandler
)
let smartcar = appDelegate.smartcar
// Generate a Connect URL
let authUrl = smartcar.authUrlBuilder().build()
// Pass in the generated Connect URL and a UIViewController
smartcar.launchAuthFlow(url: authUrl, viewController: viewController)
```
# Registering your Custom Scheme
Once a user has authorized the application to access their vehicle, the user is redirected to the `REDIRECT_URI` with an authorization code as a query parameter.
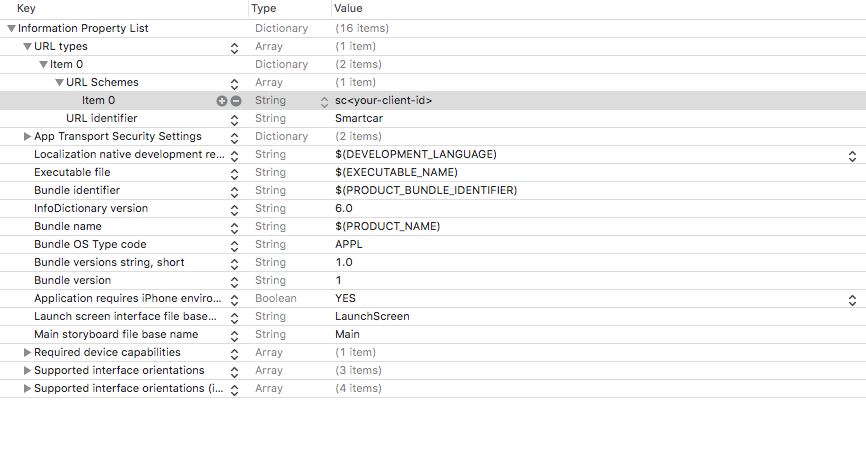
iOS applications use custom URI schemes to intercept calls and launch the relevant application. This is defined within the `Info.plist`.
1. Open up `Info.plist` and click on the grey arrow next to **URL types**.
2. Next, click on the grey arrow next to the `Item 0` dictionary and `URL Schemes` array.
3. Finally, set your `Item 0` string to the redirect URI you set up in the [Prerequisites](/docs/getting-started/tutorials/ios#prerequisites) section (i.e. 'sc' + clientId).
# Handle the response
1. The iOS application will now receive the request in the `application:(_:open:options:)` function within the AppDelegate.
```swift AppDelegate.swift theme={null}
func application(_ application: UIApplication, open url: URL, options: [UIApplicationOpenURLOptionsKey : Any] = [:]) -> Bool {
{/* TODO: Authorization Step 3a: Receive the authorization code */}
window!.rootViewController?.presentedViewController?.dismiss(animated: true , completion: nil)
smartcar!.handleCallback(with: url)
return true
}
```
2. Using the iOS SDK, the application can receive the code in the `completion callback` passed into the `SmartcarAuth` object.
```swift AppDelegate.swift theme={null}
func completion(err: Error?, code: String?, state: String?) -> Any {
{/* TODO: Authorization Step 3b: Receive the authorization code */}
print(code!);
{/* prints out the authorization code */}
}
```
# Launching Connect
Build your application in XCode and click on the **Connect your vehicle** button.
This tutorial configures Connect to launch in `test` mode by default.
In `test` mode, any `username` and `password` is valid for each brand.
Smartcar showcases all the permissions your application is asking for - `read_vehicle_info` in this case.
Once you have logged in and accepted the permissions, you should see your authorization `code` printed to your console.
# Sending the user\_id to your backend
After the user completes the Connect flow, your iOS application receives a `user_id`. Send this to your backend service for storage — your backend will use it as the `sc-user-id` header when making API requests on behalf of this user.
```swift ViewController.swift theme={null}
// Send the user_id to your backend for storage
Alamofire.request("\(Constants.appServer)/connect?user_id=\(userId!)", method: .post)
.responseJSON {_ in}
```
Token authentication should be handled entirely on your backend using the [OAuth 2.0 Client Credentials flow](/docs/api-reference/authorization/overview).
Your mobile app should never handle access tokens directly. The backend obtains a single application-level token
that works across all connected vehicles.
# Getting data from a vehicle
Once your backend has the `user_id` and an application-level access token, it can send requests to a vehicle using the Smartcar API. The iOS app will
have to send a request to the backend service which in turn sends a request to Smartcar. We have to do this because
our frontend **does not** have the access token.
Assuming our backend has a `/vehicle` endpoint that returns the information of a user’s vehicle, we can make this query in
our `completion callback` and segue into another `view` to show the returned vehicle attributes.
```swift ViewController.swift theme={null}
func completion(err: Error?, code: String?, state: String?) -> Any {
// send user_id to backend for storage
Alamofire.request("\(Constants.appServer)/connect?user_id=\(userId!)", method: .post).responseJSON {_ in
// TODO: Request Step 2: Get vehicle information
// send request to retrieve the vehicle info
Alamofire.request("\(Constants.appServer)/vehicle", method: .get).responseJSON { response in
print(response.result.value!)
if let result = response.result.value {
let JSON = result as! NSDictionary
let make = JSON.object(forKey: "make")! as! String
let model = JSON.object(forKey: "model")! as! String
let year = String(JSON.object(forKey: "year")! as! Int)
let vehicle = "\(year) \(make) \(model)"
self.vehicleText = vehicle
self.performSegue(withIdentifier: "displayVehicleInfo", sender: self)
}
}
}
return ""
}
```
# Setting up your backend
Now that our frontend is complete, we will need to create a backend service that stores the `user_id` and handles API authentication. Your backend will use the [OAuth 2.0 Client Credentials flow](/docs/api-reference/authorization/overview) to obtain an application-level access token and make requests to vehicles.
Call the Smartcar API directly over HTTP, no backend SDK required. The examples below show how to get an access token in each language.